Rod Building The Rod Building Thread

Divad

Whitefish
How do you avoid these air bubbles next to the guide feet?
View attachment 98668
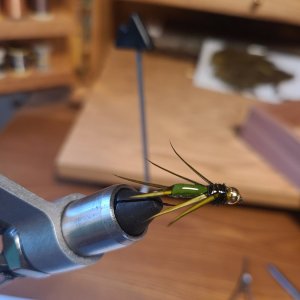
Do you apply heat with your epoxy? I use a Lite build epoxy for penetration and quickly whip a cigar style lighter (torch, no soot) near the wrap to add heat after applying.

I’d venture to say the heat is the key but I’ve also not had this problem yet to give first hand experience.
 

Divad

Whitefish
Take an old rod, throw a wrap on it and test the limits of adding heat. I know how close and how long I can stay with the lighter before bubbling/smoke occurs now after doing it. Meanwhile the heat really helps flow the epoxy, smoothing out lumps, penetrating more and bringing bubbles up to the surface.

My rookie observation.
 

Bambooflyguy

Life of the Party
I warm the two plastic bottles of Threadmaster high build a bit on my baseboard heater. Then I mix in an aluminum beer can bottom for three minutes……with a plastic stir stick. Works for me.
 

PhilR

IDK Man
Forum Supporter
Take an old rod, throw a wrap on it and test the limits of adding heat. I know how close and how long I can stay with the lighter before bubbling/smoke occurs now after doing it. Meanwhile the heat really helps flow the epoxy, smoothing out lumps, penetrating more and bringing bubbles up to the surface.

My rookie observation.
Thanks. It’s not a problem with bubbles in the mix, but filling the pocket next to the stripping guide feet. I think @Wetswinger is onto something, as the wraps were pretty snug.
 

PhilR

IDK Man
Forum Supporter
Here's some of the thread work on my last of the Winter projects. This is a 7ft-3# glass rod. I used this barberpole pattern on all of the guides. It's not too difficult after you do a couple and is really just a trim band. The sawblade pattern is a little more difficult. I made several practice runs before I tried it for real. There's two challenges. Getting the sawblades to match is tough and getting the thread to lay down between the blades a challenge as the under thread wants to pinch up. I enjoy the learning process. I really like the pearl sparkle band.

View attachment 98663View attachment 98664View attachment 98662
Those look great
 

Divad

Whitefish
Thanks. It’s not a problem with bubbles in the mix, but filling the pocket next to the stripping guide feet. I think @Wetswinger is onto something, as the wraps were pretty snug.
The air pocket is a bubble, it’s lighter than the epoxy but if the epoxy is thick it cannot displace these to the surface easily. Add a layer of thread and it’s even more difficult. Heat baby!

Curious to see if a looser wrap helps your issue 👍
 

Wetswinger

Go Deep
Forum Supporter
Thanks. It’s not a problem with bubbles in the mix, but filling the pocket next to the stripping guide feet. I think @Wetswinger is onto something, as the wraps were pretty snug.
If you want some heat you can use a hair dryer. It does loosen up the resin and lessen any bubbles ..
 

Paige

Wishing I was fishing the Sauk
I prefer to use a minib butane torch, less chance of blowing dirt or dust in vs a heat gun or hair dryer.

But is supper easy to boil the epoxy, then you have some bubbles! LOL
 

Zak

Legend
Here's some of the thread work on my last of the Winter projects. This is a 7ft-3# glass rod. I used this barberpole pattern on all of the guides. It's not too difficult after you do a couple and is really just a trim band. The sawblade pattern is a little more difficult. I made several practice runs before I tried it for real. There's two challenges. Getting the sawblades to match is tough and getting the thread to lay down between the blades a challenge as the under thread wants to pinch up. I enjoy the learning process. I really like the pearl sparkle band.

View attachment 98663View attachment 98664View attachment 98662
That sparkle band looks so great, like opal!
 

PhilR

IDK Man
Forum Supporter
Oh man, you're gonna have to redo those! Your customer prolly wouldn't have noticed.
If my client weren't some kind of cyberstalker, he never would have known.
 

PhilR

IDK Man
Forum Supporter

mcswny

Legend
Forum Supporter
Alright, well I’m just about down wrapping my first pancake and ready for epoxy. Are you all sealing the threads section by section or are you assembling the rod and doing the whole thing in one go? I’m assuming the latter? Generally speaking what’s the working time for threadmaster lite?
 

Herkileez

Life of the Party
Forum Supporter
IMO, best to do all in one go. I lightly assemble the sections, then do a wrap of masking tape on the male sections, before final push together, to prevent any unwanted finish on the male ends. I find I have about 30 mins, before the TM starts to stiffen up, and turn the rod for 5-6 hrs to prevent any sag. Don't use a syringe or mixing cup containing any silcon, o/wise the finish comes out lumpy. I use aluminum tart cups (Dollarama) for mixing the finish....aluminum also extends the working life of the epoxy.
Prob more info than you asked about..but might save you from a couple of problems.....Have fun!
 

mcswny

Legend
Forum Supporter
IMO, best to do all in one go. I lightly assemble the sections, then do a wrap of masking tape on the male sections, before final push together, to prevent any unwanted finish on the male ends. I find I have about 30 mins, before the TM starts to stiffen up, and turn the rod for 5-6 hrs to prevent any sag. Don't use a syringe or mixing cup containing any silcon, o/wise the finish comes out lumpy. I use aluminum tart cups (Dollarama) for mixing the finish....aluminum also extends the working life of the epoxy.
Prob more info than you asked about..but might save you from a couple of problems.....Have fun!

Perfect amount of info, thank you :)
 

mcswny

Legend
Forum Supporter
One more silly question. How much TM do ya'll mix up for a rod? I hate waste so I don't want to mix up an exorbitant amount and have to throw it out.
 

Wetswinger

Go Deep
Forum Supporter
One more silly question. How much TM do ya'll mix up for a rod? I hate waste so I don't want to mix up an exorbitant amount and have to throw it out.
I do two out of four sections at a time. 3cc of each fluid per 2 section unit. That's always enough as I do two thin layers over two days instead of one thick layer. Aluminum foil coated plate or cups really do help "pot time"..the time before it starts to set..
 

Bambooflyguy

Life of the Party
I bought a small set of metal measuring spoons. I use the next to the biggest for one rod. It makes more than I need but too little would be worse. Another thing I’ve found mixing small amounts sometimes won’t cure as fast. Seems like Threadmaster has a real shelf life of a couple of years….I don’t like to waste either but for the final step in building rods you don’t want to skimp on old crap! Ask me how I know…..
 

Squatchin

Life of the Party
Forum Supporter
Old rod new tricks. This is a 2 piece Heddon, faux‐'boo-glass. A lot of the finish came off whe. I removed the cracked m thread coating and dry rotted wraps, so I ended up having to go heavier on the new thread wraps and finish than I would have wanted to. But the goal is to have something fishable once again with all the charm of a rat rod that doest stray too far from the original ethos of the rod 7 decades ago.20240123_232816.jpg20240123_233034.jpg20240124_074349.jpg20240124_074323.jpg20240124_074310.jpg
 

Attachments

  • 20240123_232816.jpg
    20240123_232816.jpg
    269.1 KB · Views: 3
Top