The only rods that last 40 years are the ones built on shitty blanks that never get used.
You are using an out of date browser. It may not display this or other websites correctly.
You should upgrade or use an alternative browser.
You should upgrade or use an alternative browser.
Rod Building The Rod Building Thread
- Thread starter Divad
- Start date
Divad
Whitefish
I use this pack from HF and split making 1/4in @ 18in. I’ve been using the 80grit ones on the two reamers I just made and like it. The 120 would probably work too but my goal is to ream it quickly as to not create too much heat on the reamer. Also easier to hand ream 80 but used the drill for concentricity.@Divad i finally cut off the guides of the blank I’m using as a reamer, next up is picking up some sandpaper. What grit did you use?
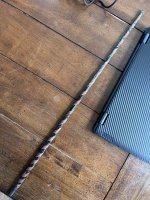
Split in two one belt is enough to do a 2-3ft reamer. I dab some superglue, wrap it and then go back and brush the edges with epoxy. Been using this stuff, thinned with acetone it filled the blank very well too.
Last edited:
Thank you!!I use this pack from HF and split making 1/4in @ 18in. I’ve been using the 80grit ones on the two reamers I just made and like it. The 120 would probably work too but my goal is to ream it quickly as to not create too much heat on the reamer. Also easier to hand ream 80 but used the drill for concentricity.
View attachment 89786
Split in two one belt is enough to do a 2-3ft reamer. I dab some superglue, wrap it and then go back and brush the edges with epoxy. Been using this stuff, thinned with acetone it filled the blank very well too.
This is what I do too, although I'll use varnish on my bamboo rods.I've been using a sparce 1st coat. Seems I always have a thread end or fuzzy chunk sticking out, so it's one thin coat, razor cut the offensive lumps out and a beautiful finish coat. I found spreading the epoxy out on a tinfoil plate really helps eliminate the bubbles..
For the reamer, I have both a rat tail file and a rat tail rasp. I'm working on a tuna rod, which has a giant diameter butt section and I need to ream about half of the diameter of the grip. Takes forever, and a lot of care to keep it round.
As for bling, I'm going back and forth on whether to add a two turn silver tipping wrap to the black wraps/black rod I'm working on now. Although, I had no problem with a subtle black/silver theme- for a friend who prefers a rival to the Raiders.
Divad
Whitefish
Beautiful and inspiring work.
Sorry, not a flyrod, I hope you'll bear with me:
Two weeks ago, I found a one-piece solid fiberglass salmon rod in a Goodwill store here in Chicagoland. I used this kind of rod for chinook fishing as a kid and young man, and some of you may remember the type - this one is 6'5", and the ones I used earlier were shorter than that. I picked it up for $1.99.
This rod has a wooden handle, and is missing the rubber knob previously on the end of it. It had two of only three original guides, but they were held in place with electrical tape. After peeling it off, I saw the original pattern, in brown thread. The tip top was gone, but the tip was squared-off, and I feel it was never broken. I removed the tape and threads, and cleaned it up as well as I could. It is heavily stained and after cleaning and 220-grit sandpaper did little to clean it further, I decided that was enough. There are also some sort of marks near the tip that may or may not cause the rod to collapse under its first load. I invested $15 in four guides, a tip top, and a butt plug (Ha ha, he said, oh never mind) and wrapped them with black and gold thread that I have had for a while. I used the little piece of hot melt wax to attach the tip top, and I'm ready to go. Oh, I will go tomorrow and get some slow-cure epoxy at the local big box store; I remain unconvinced that the specialty stuff is greatly better, at least not for a $1.99 rod. Now all I need is an invitation from my fishing buddy to go out on Lake Michigan to catch salmon, browns, and steelhead - er, lake run rainbow trout
Again, sorry for the non-flyrod building content, but my point is that now I'm ready to start that 9' 3wt blank I have stashed away. That one, although not an expensive blank, I will spend the time to look good as well as be functional. I'd not built a rod in about 7 years before I rebuild the salmon rod, and now have a little more confidence to tackle something better.
Finally getting this rod built.
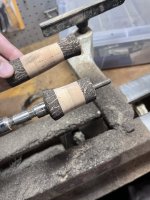
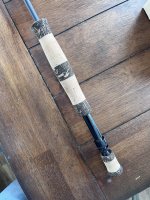
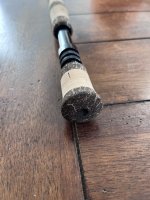
It’s a bit late, but it’s for a good friend who wouldn’t leave my side 4 years ago for a week when I donated my kidney—cleaned my pee jug and everything for me when my wife couldn’t be there because she needed to be home with our then 18 month old. I always wanted to figure out a gift for him and I landed on building him a rod. However, maybe my first rod wasn’t the best choice . Regardless, here we are. He’s moving to Maine next year so I figured a 7’ 3wt built on one of Shane Gray’s Rodmaker blanks. He’s got big hands so I went with a 6” Ritz grip. This morning I got the grip and stent epoxied on. Next I’ll start taping and wrapping the guides. I may have some questions interpreting guide spacing charts. I got a tad bit of epoxy on the grip. I figure I can sand it off at the end?
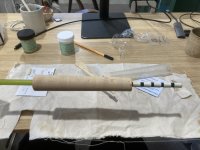
It’s a bit late, but it’s for a good friend who wouldn’t leave my side 4 years ago for a week when I donated my kidney—cleaned my pee jug and everything for me when my wife couldn’t be there because she needed to be home with our then 18 month old. I always wanted to figure out a gift for him and I landed on building him a rod. However, maybe my first rod wasn’t the best choice

Divad
Whitefish
What a cool gift for such a staunch friend, looks great. Your first rod will be a good choice, I found myself asphyxiated on minute details and rechecking tutorials countlessly. You can sand that right off later by hand or depending on your lathe you can spin it up too after it’s all done.Finally getting this rod built.
It’s a bit late, but it’s for a good friend who wouldn’t leave my side 4 years ago for a week when I donated my kidney—cleaned my pee jug and everything for me when my wife couldn’t be there because she needed to be home with our then 18 month old. I always wanted to figure out a gift for him and I landed on building him a rod. However, maybe my first rod wasn’t the best choice. Regardless, here we are. He’s moving to Maine next year so I figured a 7’ 3wt built on one of Shane Gray’s Rodmaker blanks. He’s got big hands so I went with a 6” Ritz grip. This morning I got the grip and stent epoxied on. Next I’ll start taping and wrapping the guides. I may have some questions interpreting guide spacing charts. I got a tad bit of epoxy on the grip. I figure I can sand it off at the end?
View attachment 91356
Enjoy the guide wrapping process! I find it satisfying and rather soothing.
Question for the group.
So I put all three pieces of a blank together to start placing and tape the guides and one of the ferules has basically no gap (1/16"). I really don't want to deal with the maker mostly because I recently had an interaction with him that was less than stellar (plus, the grip and stent is already glued on), plus it's a very inexpensive blank to begin with.
I'd lake to make this work and was wondering A: wrapping the ferrule will tighten it up a bit and/or B: Could I apply a small amount of epoxy on the male end to increase the gap?
See if adding a coat of wax to male ferrule tightens it up. If you add epoxy, you could sand it afterwards, when it's well set, to get a smooth fit..
Last edited:
New S-Glass build. Garrison down loading seat with cork insert. Ritz shaped grip. Dark single foot guides. Wrapped in Olive with Red thread. 5-piece, 19in pack rod.
Attachments
Last edited:
Very nice!New S-Glass build. Garrison down loading seat with cork insert. Ritz shaped grip. Dark single foot guides. Wrapped in Olive with Red thread. 5-piece, 19in pack rod.
Divad
Whitefish
I found this post useful, it seems the best action would be to trim the female ferrule to allow the male to seat tighter into the taper. This is just my brief researched two cents.Question for the group.
So I put all three pieces of a blank together to start placing and tape the guides and one of the ferules has basically no gap (1/16"). I really don't want to deal with the maker mostly because I recently had an interaction with him that was less than stellar (plus, the grip and stent is already glued on), plus it's a very inexpensive blank to begin with.
I'd lake to make this work and was wondering A: wrapping the ferrule will tighten it up a bit and/or B: Could I apply a small amount of epoxy on the male end to increase the gap?
Yup, this is where I’ve landed. Will get to it this weekend.I found this post useful, it seems the best action would be to trim the female ferrule to allow the male to seat tighter into the taper. This is just my brief researched two cents.
flybill
Life of the Party
I've never used epoxy on a ferrel.. guess it makes sense, but I would worry if you were fishing it would heat up and get sticky making the rod parts stick. Not opposed to it, but wax has always worked for me. If the ferrel is so loose that wax won't work, I would overwrap the female side of it with thread and epoxy it. Or send the piece or rod into wherever the rod is made and have the section or rod replaced.See if adding a coat of wax to male ferrule tightens it up. If you add epoxy, you could sand it afterwards, when it's well set, to get a smooth fit..
Question:
When you're laying out your guides. How do you take the ferule gap into account for your measure measurements. For instance, my 6th guide after my tip top comes in at 35 ¼" and this lands on the 2nd piece. Do I take the 1/4" ish gap into account or do I measure the pieces as if there was no gap? Am I over thinking this?
When you're laying out your guides. How do you take the ferule gap into account for your measure measurements. For instance, my 6th guide after my tip top comes in at 35 ¼" and this lands on the 2nd piece. Do I take the 1/4" ish gap into account or do I measure the pieces as if there was no gap? Am I over thinking this?

